Here are so many ways to crimp the edge of your pie crust—calling that index finger!—and with monsoon season nearly behind us, and stone fruit/berry/everything-delicious season ahead, We wanted to give step-by-step guides for 5 pretty edges.
First, a few general guidelines for decorative pie edges:
Crimp ‘N Fork
I love this one, too. It combines the looks of two classics: a finger crimp and a forked edge. In order for this look to work properly, you need to set the crimps a little further apart, giving yourself plenty of room to apply the fork marks later. I also find it’s especially helpful to use a smaller fork, with tines that are a little closer together—but you can use whatever you’ve got!

- his edge starts a lot like a classic crimp, but in reverse. Your dominant hand will be doing the bulk of the action, and your non-dominant hand will be providing the shape. Use the index finger of your dominant hand, and use the index finger and thumb of your non-dominant hand to form a V shape.
- Start anywhere on the pie. Your index finger will work from the outside of the pie and push inward, and the V will form the shape from the inside edge of the dough. Push down and slightly inward with your dominant index finger, and let the V shape of your non-dominant hand form the crimp shape as you push. I press outward with the V shape, but only slightly; the main action should be coming from your dominant hand. Leave some space between the finger crimps (I usually opt for about 1/2 inch between each crimp), so you’ve got room for the fork crimps.
- Once you’ve crimped the pie all the way around, use your index finger to press the excess dough in between crimps flat to the edge of the pie plate. This makes it easier to make the fork crimps in a few moments!
- Press floured fork tines onto the dough you just flattened in between each crimp. Press firmly, but not so hard you hit the pie plate. Continue all the way around the pie!
Crosshatch

This is a nice rustic look for pies. It’s as easy as the traditional fork crimp, with a little something extra. I like this look on double-crust pies, too! Different forks have different widths of tines (and spaces between those tines); you might find that you like the look from certain forks better than others.
- Start by making a traditional fork crimp all around the pie, holding the fork tines vertically along the dough (i.e. as though making a cross with the tines and the crust). Press floured fork tines into the pie firmly, but not so hard you mash the dough down and hit the pie plate.
- Press around the pie again, this time holding the fork tines horizontally (i.e. opposite the last crimp, following the crust all the way around). Press with just the edges of the fork, then start the next press where the last one ended. You’ll end up with little boxes of crosshatched dough.
- Sometimes, pressing with a fork can cause the dough to become a bit uneven at the edges of the pie. If this happens, chill the crust after you do the crosshatch, then use a paring knife to cut the excess dough away, holding it flush to the edge while you cut.
Fork Chevron

This is my favorite fork crimp because it looks so snazzy but it’s insanely easy. Same rules about the size of the fork go as above with the crosshatch!
- Hold a floured fork at a 45-degree angle toward the right, to make diagonal lines on the pie. The tine furthest to the left will make a long line and the tine furthest to the right will make a short line. Press firmly into the dough, but not so hard that you mash the dough and hit the pie plate.
- Rotate the fork to hold it at a 45-degree angle, this time toward the left. This time, you’ll make diagonal lines the other way. In theory, the lines will line up to make a triangular or chevron-like pattern (but even if they don’t line up exactly, it still looks cool)! Press firmly into the dough.
- Repeat this process all the way around the pie, first by angling right then again by angling left. If the dough becomes a bit uneven at the edges of the pie, chill the crust after you do the chevron, then use a paring knife to cut the excess dough away, holding it flush to the edge while you cut.
Spoon Scallop

Forks aren’t the only utensil that can help make a pretty edge. This simple scallop is so easy, and looks great on hand pies, too! Different spoons will have different looks when pressed into the pie: Rounder-edged spoons will leave a swoopier look, while pointier-edged spoons will give a sharper look.
- Coming from the outside of the pie, press the edge of a floured spoon into the dough, close to the inner edge of the pie plate’s edge. Repeat all the way around the pie.
- Press the spoon into the dough again, this time just below the impressions you made the first time, making two little scallop shapes.
- If the dough becomes a bit uneven at the edges of the pie, chill the crust, then use a paring knife to cut the excess dough away, holding it flush to the edge while you cut.
Checkerboard

This is a fun old-school edge that’s that’s commonly used for chess and other custard pies, though looks great on all kinds. You’ll want a trusty pair of scissors (one of my favorite tools for all pies!) on hand to help you achieve the look. You can successfully do the edge before you fill the pie, but I personally find it easier to fill the pie first, then finish the edge.
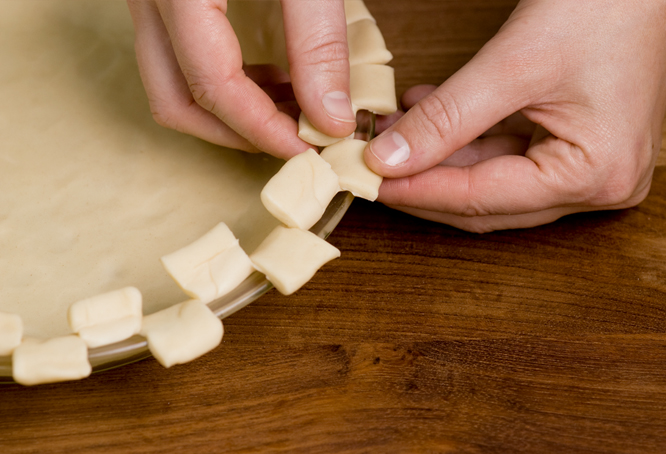
- When you line the pie plate, leave 1 inch of excess all the way around, then thoroughly chill the pie. Once the dough is nice and cold, use scissors to trim the dough flush with the edge of the pie plate.
- Pick a place to start, gently lift up the edge of the dough, and use scissors to cut anywhere between 1/2 inch to 1 inch into the dough. Make another cut of the same size 1/2 to 1 inch in either direction from the first cut, making a square shape. Repeat this all the way around the pie, making sure you have an even number of squares when you’re finished.
- Fill the pie, then begin to finish the edge. Fold one of the squares over the filling. Skip the next square, leaving it sitting on the edge of the pie plate. Then fold the next square over the filling—and continue, folding alternating squares over the filling all around the pie.