Here are so many ways to crimp the edge of your pie crust—calling that index finger!—and with monsoon season nearly behind us, and stone fruit/berry/everything-delicious season ahead, We wanted to give step-by-step guides for 4 pretty edges.
First, a few general guidelines for decorative pie edges:
Use A Recipe You Love.
This All Buttah Pie Dough is a classic. It’ll turn out expertly flaky, so long as you let it chill well before rolling. Which brings me to the next point…
Make Sure Your Pastry Is Well-Chilled.
Start with cold dough, then chill it after you’ve rolled it out and lined the pan. We’ll even chill it with the excess hanging all about before we trim it, which helps the dough relax and prevents shrinking! I’m a fan of chilling it in the freezer, but be warned: If your dough is too cold, it will be difficult to work with and may be likely to crack.
Give Yourself Some Excess.
This is one of our favorite pie tips, and it’s specifically helpful for beautiful edges. When you go to trim away the excess dough, leave yourself about 1 inch of excess from the edge of the pie plate. Fold this excess under itself, then press gently all the way around to seal it and make it flush with the edge of the pie plate.
This excess serves a few purposes. First, it creates a thicker “wall” of dough at the edge, which is less likely to fall or shrink in the oven, especially if properly adhered to the pie plate with a well-sealed crimp. Second, it makes it easier to apply decorative edges. Thicker dough gives you more to work with, and it’s more likely to hold its shape in the oven. Last but not least, it gives you more crunchy, flaky pie dough at the end of each slice—and that’s seriously delicious. I pity the fool who tries to cheat me out of as much crust as I can possibly get on my pie, so I like to build in a little extra right from the get-go
Rotate The Pie Plate While You Work.
As you crimp, rotate the pie plate occasionally rather than stretching your arms or adjusting your body to work around the edge. You’ll get more even crimps if you stay in the same spot!
After You’ve Got Your Edge, Get It Even Colder.
Once you’ve applied your decorative edge, go all out with the chilling—the freezer included. The colder the pie dough is when it hits the oven, the more likely it will be to retain its shape.
Use A Pie Plate With A Wider Edge.
This is a trouble-shooting tip for those who just can’t seem to keep their edges from sloping down once they hit the oven. A lot of pie plates have almost no edge at all, and that means there’s a higher margin for error. If your dough isn’t sealed strongly, crimped tightly, or chilled thoroughly, it may slide down in the heat of the oven. But if you use a pie plate with an edge (at least a 1/2-inch wide), you’ve given yourself a (literal) support system! Once you get the hang of it, you can make a gorgeous pie with any plate you wish, but it’s a great place to start if you’ve had trouble!
Classic Finger Crimp/Tiny Crimp:
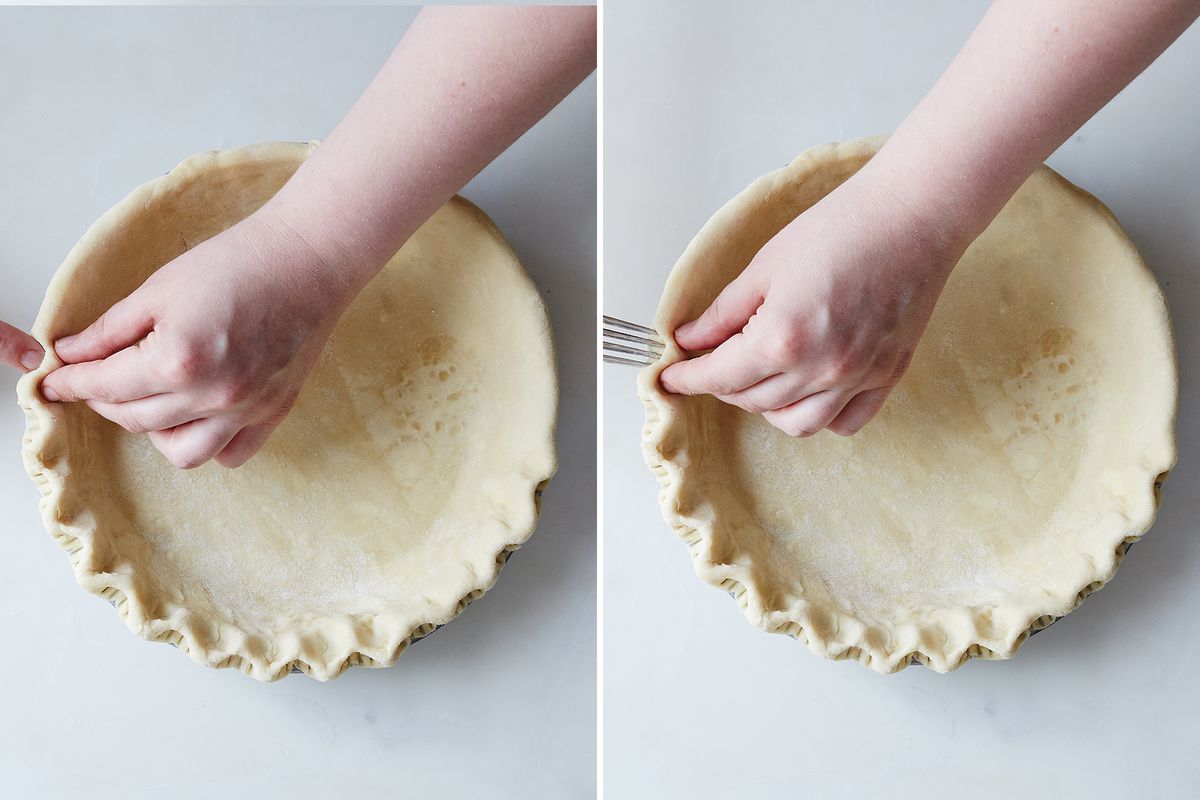
- Your dominant hand will be doing the bulk of the action, and your non-dominant hand will be providing the shape. Use the index finger of your dominant hand, and use the index finger and thumb of your non dominant hand to form a V shape.
- Start anywhere on the pie. Push down and slightly outward from the inside of the pie with your dominant index finger, and let the V shape of your non-dominant hand form the crimp shape from the outside edge of the dough as you push. I press inward with the V shape, but only slightly; the main action should be coming from your dominant hand. The wider your fingers are, the larger the shape will be.
- Start the next crimp where the first one ended, and work your way around the pie. When you’re finished, you can go back around and adjust any misshapen crimps as needed.
Rope Crimp

I love, love, love the look of this edge. People who are super-skilled can do this look with one hand, using their thumb and index finger to make the shape all the way around. But I find it’s easier to get a uniform look using the index fingers of both hands.
- To make this crimp, you’ll use your two index fingers held parallel next to each other at a slight angle. Squeeze the dough between the inner edges of your fingers, raising it up in the center and flattening it a bit on both sides.
- Rotate the pie, then repeat the process, being sure to hold your fingers at the same angle as you did the first time. Start the next crimp where the first one ends, and work all the way around the pie. When you’re finished, you can go back around and adjust any misshapen crimps as needed.
Scalloped Edge
This edge looks rather delicate, I think—and I first learned it as the traditional edging style for the classic pithier pastry. But like many décor techniques, it totally works for pie too! The key to this edge is well-chilled pastry. Warm pastry won’t hold its shape at all! The size of the edge is pretty much determined by the size of your finger, so it’s not one you can make wider or smaller as desired.

- This edge starts a lot like a classic crimp, but in reverse. Your dominant hand will be doing the bulk of the action, and your non-dominant hand will be providing the shape. Use the index finger of your dominant hand, and use the index finger and thumb of your non-dominant hand to form a V shape.
- Start anywhere on the pie. Your index finger will work from the outside of the pie and push inward, and the V will form the shape from the inside edge of the dough. Push down and slightly inward with your dominant index finger, and let the V shape of your non-dominant hand form the crimp shape as you push. I press outward with the V shape, but only slightly; the main action should be coming from your dominant hand. Leave some space between the finger crimps (I usually opt for about 1/2 inch between each crimp), so you’ve got room for the fork crimps.
- Once you’ve crimped the pie all the way around, use your index finger to press the excess dough in between crimps flat to the edge of the pie plate. This makes it easier to make the fork crimps in a few moments!
- Press floured fork tines onto the dough you just flattened in between each crimp. Press firmly, but not so hard you hit the pie plate. Continue all the way around the pie!
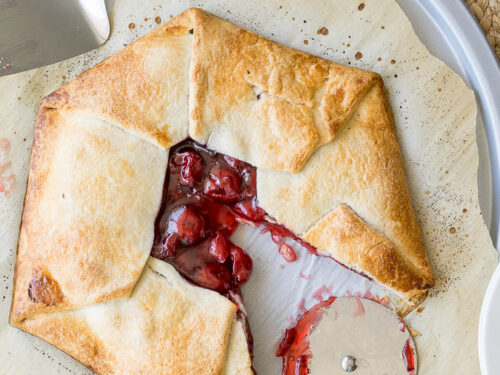
Foldover
This easy, breezy look is how many galettes are finished—but why should they get to have all the fun? This look is perfect for a traditional pie, too, and gives a little extra crust-to-filling action for all my fellow crust-lovers out there.
This easy, breezy look is how many galettes are finished—but why should they get to have all the fun? This look is perfect for a traditional pie, too, and gives a little extra crust-to-filling action for all my fellow crust-lovers out there.
- When you line the pie plate, be sure you leave at least 1 inch (and up to 1 1/2 inches) of excess dough all the way around the plate. If you want a more precise look, trim the rough edges away with scissors; otherwise, leave it as it is!
- Add filling to the pie, ideally filling it so it’s flush with the edge of the pie plate. Once the filling is inside, fold one piece of the dough over onto the filling. Fold the next piece over, allowing it to overlap on the first fold as needed. Repeat all the way around the pie!